How-To: Completely Dismantle A PCX
Moderator: Modsquad
-
PCX 125 CANDY RED
- Regular User

- Posts: 81
- Joined: Sat May 23, 2015 1:46 am
- Year: 2013
- Color: RED
- Location: Europe
Re: How-To: Completely Dismantle A PCX
Mel46 after dissemble PCX for few times can you feel that something is not like it used to be from the factory? Panel noise, moving, sound, anything?
Smile - it's easy =)
-
PCX 125 CANDY RED
- Regular User
- Posts: 81
- Joined: Sat May 23, 2015 1:46 am
- Year: 2013
- Color: RED
- Location: Europe
Re: How-To: Completely Dismantle A PCX
Smile - it's easy =)
-
Mel46

- Forum Benefactor

- Posts: 6964
- Joined: Tue Nov 13, 2012 5:13 pm
- Year: 2013
- Color: red PCX
- Location: Dallas, Ga USA
Re: How-To: Completely Dismantle A PCX
After you remove panels enough times the tabs get weak and start breaking. Still, if you take your time things will go back together without those one or two broken tabs, and you won't notice them. After enough times, I eventually order a replacement panel for the next go around. If there is a part that you always have problems with, and you can't seem to remove it without breaking a tab, just keep the old one on. You will be removing it again at some point anyway. The below part is my biggest headache...or use to be until I broke a few tabs. 
COVER, METER PANEL *R340C* (CANDY ROSY RED)
64338-KWN-710ZC
Remember to compare shipping costs whenever you are looking for a replacement part. That could make the difference between buying it online or locally.
COVER, METER PANEL *R340C* (CANDY ROSY RED)
64338-KWN-710ZC
Remember to compare shipping costs whenever you are looking for a replacement part. That could make the difference between buying it online or locally.
Currently own:
Red 2013 Honda PCX150
Givi tall windshield & tailbox - Lots of extra lights
Custom seat from Thailand - Bad Boy Airhorn
Takegawa Lowering Shocks - Michelin City Grip Tires
Headlight assy upgraded to LEDs w/HS5 main bulbs
NCY variator, drive face, and rollers
Red 2013 Honda PCX150
Givi tall windshield & tailbox - Lots of extra lights
Custom seat from Thailand - Bad Boy Airhorn
Takegawa Lowering Shocks - Michelin City Grip Tires
Headlight assy upgraded to LEDs w/HS5 main bulbs
NCY variator, drive face, and rollers
-
PCX 125 CANDY RED
- Regular User
- Posts: 81
- Joined: Sat May 23, 2015 1:46 am
- Year: 2013
- Color: RED
- Location: Europe
Re: How-To: Completely Dismantle A PCX
Thank you, Mel46Mel46 wrote:After you remove panels enough times the tabs get weak and start breaking. Still, if you take your time things will go back together without those one or two broken tabs, and you won't notice them. After enough times, I eventually order a replacement panel for the next go around. If there is a part that you always have problems with, and you can't seem to remove it without breaking a tab, just keep the old one on. You will be removing it again at some point anyway. The below part is my biggest headache...or use to be until I broke a few tabs.
COVER, METER PANEL *R340C* (CANDY ROSY RED)
64338-KWN-710ZC
Remember to compare shipping costs whenever you are looking for a replacement part. That could make the difference between buying it online or locally.
Smile - it's easy =)
-
iceman
- Forum Benefactor
- Posts: 2861
- Joined: Sun Dec 29, 2013 11:43 pm
- Year: 2014 125 (LED)
- Color: White
- Location: London, England
Re: How-To: Completely Dismantle A PCX
I've taken the lhs lower panel off about 5 times now and always wonder when something is going to snap (last few times for variator / belt work) < as always, very costly panels in the UK so always a pain compared to 'throw-away' pricing in the US or Thailand.
Like Mel mentioned, two panels that I lost almost all the tabs on were the two inner front panels (one with the small door and the other around the ignition) which needed to come off to gain access to the CBS brake fluid reservoir. The service manual and videos showed them coming off easilly as no screws, just grip and pull, but they were a right '*****' to get off.
They've both gone back on and after many months riding, have not come loose even with just one or two tabs left. Cost for repalcement here is horrendous - much more expensive for the right fit and colour in the UK.
tbh - best removing panels in waremer weather than winter if possible, not only for the obvious but the plastic tabs and yellow 'snap bits that fit to them' will be less brittle.


Re: How-To: Completely Dismantle A PCX
Was looking at maddie's garage wall in the first post....
They have a medication for people who struggle with this issue. (and Groups, for their families)
just sayin'
Fish
*not that it isn't a ripping good post!
They have a medication for people who struggle with this issue. (and Groups, for their families)
just sayin'
Fish
*not that it isn't a ripping good post!
-
Mel46
- Forum Benefactor
- Posts: 6964
- Joined: Tue Nov 13, 2012 5:13 pm
- Year: 2013
- Color: red PCX
- Location: Dallas, Ga USA
Re: How-To: Completely Dismantle A PCX
I have not seen his new garage but the previous one was a great place to work on the bikes. I use to bring ours over so that he could help me change out something or other. He has all sorts of tools!
Currently own:
Red 2013 Honda PCX150
Givi tall windshield & tailbox - Lots of extra lights
Custom seat from Thailand - Bad Boy Airhorn
Takegawa Lowering Shocks - Michelin City Grip Tires
Headlight assy upgraded to LEDs w/HS5 main bulbs
NCY variator, drive face, and rollers
Red 2013 Honda PCX150
Givi tall windshield & tailbox - Lots of extra lights
Custom seat from Thailand - Bad Boy Airhorn
Takegawa Lowering Shocks - Michelin City Grip Tires
Headlight assy upgraded to LEDs w/HS5 main bulbs
NCY variator, drive face, and rollers
-
PCX 125 CANDY RED
- Regular User
- Posts: 81
- Joined: Sat May 23, 2015 1:46 am
- Year: 2013
- Color: RED
- Location: Europe
Re: How-To: Completely Dismantle A PCX
Did you install Bad Boy horn ? Are you happy with it?Mel46 wrote:Dave, I hope to learn a lot about tearing these down from you. I am still a bit apprehensive when I start in a new area, but the more you show me how, the more confident I get. I still have to take it apart to add my Bad Boy horn, and that is going to be a, challenge, but as long as you walk me through it I know that I can do it. If you add more to this thread I will find a way to turn it into a PDF file that others can view when they need it, if you don't mind. I have other how-tos that I use now that I printed out. Great to have a print out to work with when I need to. Thanks for showing us how.
Smile - it's easy =)
-
WhiteNoise

- Official Moderator

- Posts: 8784
- Joined: Mon Nov 07, 2011 11:15 pm
- Year: 2015 PCX 150esp
- Color: Pearl *White*
- Location: L.I. N.Y.
Re: How-To: Completely Dismantle A PCX
PCX 125 CANDY RED, Before we go Off Topic, please click on the forums search button found at the top of any page. When you arrive at the search page, type in keywords: installing horn. Then choose to search in these 2 forums: How-to, and Accessories. Now tap the search button found on that page.
There ya go, Lots to read
You asked earlier > Here are Other videos on how-to dismantle PCX plastics:
1) by makeshifthappen his YouTube channel: https://m.youtube.com/user/Niceburg400/videos
2) by member homie his YouTube channel: Precision Cutdown - https://m.youtube.com/results?search_qu ... on+Cutdown
Location, Year & Color - Please enter Yours today!
How? Log in. Click the User Control Panel button (top right of any page). Upon destination, click Profile in left column. Look >See the questions? Please Complete. We Thank You
How? Log in. Click the User Control Panel button (top right of any page). Upon destination, click Profile in left column. Look >See the questions? Please Complete. We Thank You
-
Yorkie150

- Regular User
- Posts: 281
- Joined: Sun Nov 17, 2019 5:24 pm
- Year: 2018/19
- Color: RED
- Location: Yorkshire - UK
Re: How-To: Completely Dismantle A PCX
great photos of the body work removal process - but just want to check.....Is the process the same for a 2018/19 125 pcx?
I need to remove the centre black panel ( around the fuel filler ) on mine to routes a cable from my new GPS unit mounted on the handle bar back down to the battery ...or do I need to remove anything else ?...thanks in advance .
I need to remove the centre black panel ( around the fuel filler ) on mine to routes a cable from my new GPS unit mounted on the handle bar back down to the battery ...or do I need to remove anything else ?...thanks in advance .
https://www.facebook.com/groups/769137659827490/
-
Mel46
- Forum Benefactor
- Posts: 6964
- Joined: Tue Nov 13, 2012 5:13 pm
- Year: 2013
- Color: red PCX
- Location: Dallas, Ga USA
Re: How-To: Completely Dismantle A PCX
I don't know that much about the newest models but on my 2013 model I have to take the seat off so that I can remove that panel without breaking any tabs.
Currently own:
Red 2013 Honda PCX150
Givi tall windshield & tailbox - Lots of extra lights
Custom seat from Thailand - Bad Boy Airhorn
Takegawa Lowering Shocks - Michelin City Grip Tires
Headlight assy upgraded to LEDs w/HS5 main bulbs
NCY variator, drive face, and rollers
Red 2013 Honda PCX150
Givi tall windshield & tailbox - Lots of extra lights
Custom seat from Thailand - Bad Boy Airhorn
Takegawa Lowering Shocks - Michelin City Grip Tires
Headlight assy upgraded to LEDs w/HS5 main bulbs
NCY variator, drive face, and rollers
-
Brice
- Forum Benefactor
- Posts: 31
- Joined: Thu May 23, 2019 8:26 pm
- Year: 2013
- Color: Red
- Location: Youngstown, OH -USA
Re: How-To: Completely Dismantle A PCX
Wonderful timing for the Winter Work!
Y'all are the best!
Y'all are the best!
-
Yorkie150
- Regular User
- Posts: 281
- Joined: Sun Nov 17, 2019 5:24 pm
- Year: 2018/19
- Color: RED
- Location: Yorkshire - UK
Re: How-To: Completely Dismantle A PCX
Even though my workshop is heated - this is a job for spring
https://www.facebook.com/groups/769137659827490/
-
PCX 125 CANDY RED
- Regular User
- Posts: 81
- Joined: Sat May 23, 2015 1:46 am
- Year: 2013
- Color: RED
- Location: Europe
Re: How-To: Completely Dismantle A PCX
Does anyone have original pictures from topic starter?
Smile - it's easy =)
-
PCX 125 CANDY RED
- Regular User
- Posts: 81
- Joined: Sat May 23, 2015 1:46 am
- Year: 2013
- Color: RED
- Location: Europe
Re: How-To: Completely Dismantle A PCX
UPD sorry due to internet connection took me some time to download images, was not patient.
I think i'am ready to install this one https://www.aliexpress.com/item/4000116 ... mainSearch
AILEO Canbus 90W/Pair Lamp
H4 LED Mini Projector Lens
Automobles Bulb 20000LM Conversion Kit Hi/Lo Beam Headlight 12V24V RHD LHD
I think i'am ready to install this one https://www.aliexpress.com/item/4000116 ... mainSearch
AILEO Canbus 90W/Pair Lamp
H4 LED Mini Projector Lens
Automobles Bulb 20000LM Conversion Kit Hi/Lo Beam Headlight 12V24V RHD LHD
Smile - it's easy =)
-
PCX 125 CANDY RED
- Regular User
- Posts: 81
- Joined: Sat May 23, 2015 1:46 am
- Year: 2013
- Color: RED
- Location: Europe
Re: How-To: Completely Dismantle A PCX
two large pins are broken. The only thing I did wrong.Lift the meter panel out. It has two large pins on the front that go into rubber grommets, so lift it towards the back of the bike and upwards.
Done in 2 hours for the first time.
But also spend lot off time for stickers for each screw.
Video, list and stickers.
Smile - it's easy =)

Re: How-To: Completely Dismantle A PCX

2021 PCX 150. Rear pannel has a smaller, "home plate" shaped peice in the middle that (seems to) have to be removed first, but I don't want to break it. Can someone tell me how?
Re: How-To: Completely Dismantle A PCX
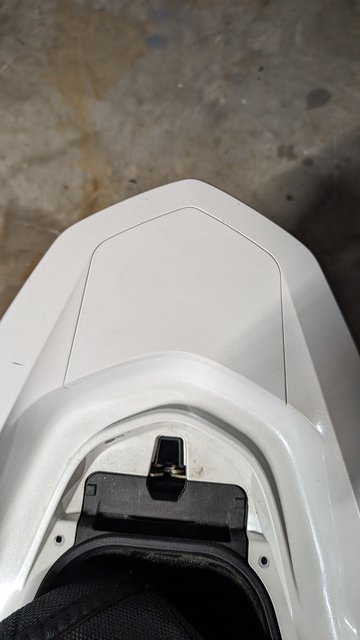
Sorry. This one above.