Changing rear shock DIY

Having trouble? Need more info on something mechanical? Ask here!

Moderator: Modsquad

User avatar
alx123
Bangkok Rider
Bangkok Rider
Posts: 936
Joined: Mon Jul 25, 2016 10:58 am
Year: 2016
Color: Fast White
Location: Thailand

Changing rear shock DIY

Post by alx123 »

https://www.youtube.com/watch?v=FTyBCsVXZEs


Saw this video and I think it looks easy enough to do.

My ordered YSS GZA rear shock will arrive tomorrow and I have nothing much better to do over this weekend.

I'm not sure if I'm right, but it looks so simple.

1. Remove the underseat box
2. Remove the air filter box
3. Remove some of the exhaust screws to get more space

What size wrenches should I be needing? I see 12, 8?

I also have a torque wrench and the torque values from the service manual.

In reality, this will only cost me a few bucks if I visit any garage here in Thailand, but there is something satisfying about manual labor and fixing or messing things up with your own hands. :lol:

I will have the front shock upgrade next week done by a mechanic. I think that one is a little bit complicated for me so...

I'll let you know if I mess it up or something :lol:
Everything looks better from the inside of a motorcycle helmet...
User avatar
alx123
Bangkok Rider
Bangkok Rider
Posts: 936
Joined: Mon Jul 25, 2016 10:58 am
Year: 2016
Color: Fast White
Location: Thailand

Re: Changing rear shock DIY

Post by alx123 »

More details after I watched the video

Socket 8,10,12,14
Hexagon 5
Screw Driver
Everything looks better from the inside of a motorcycle helmet...
User avatar
alx123
Bangkok Rider
Bangkok Rider
Posts: 936
Joined: Mon Jul 25, 2016 10:58 am
Year: 2016
Color: Fast White
Location: Thailand

Re: Changing rear shock DIY

Post by alx123 »


There is an English version :roll:

This is the shock I bought
gza.jpg
gza.jpg (23.2 KiB) Viewed 2650 times
Everything looks better from the inside of a motorcycle helmet...
User avatar
Mel46
Forum Benefactor
Forum Benefactor
Posts: 6959
Joined: Tue Nov 13, 2012 5:13 pm
Year: 2013
Color: red PCX
Location: Dallas, Ga USA

Re: Changing rear shock DIY

Post by Mel46 »

It looks like it is much easier (in some ways) on the newer bikes than on ones like my 2013 model. You still have to take the underseat storage bin out, but on the 2013 model you have a bit of plastic to remove. I certainly didn't have to take as many screws and bolts off, but that guy has figured out how to do it without taking very many plastics off. Keep in mind that he has been doing this for awhile, so it looks easier than it is.
Currently own:
Red 2013 Honda PCX150

Givi tall windshield & tailbox - Lots of extra lights
Custom seat from Thailand - Bad Boy Airhorn
Takegawa Lowering Shocks - Michelin City Grip Tires
Headlight assy upgraded to LEDs w/HS5 main bulbs
NCY variator, drive face, and rollers
User avatar
alx123
Bangkok Rider
Bangkok Rider
Posts: 936
Joined: Mon Jul 25, 2016 10:58 am
Year: 2016
Color: Fast White
Location: Thailand

Re: Changing rear shock DIY

Post by alx123 »

I agree that it looks easier than it's actually is.

I just realized that in the 2016 model I don't even need to touch the exhaust and the air filter box since the lower rear shock's bolts are already unobstructed.

My shocks arrived today so I will try to install them tomorrow...
shocks.jpg
shocks.jpg (170.3 KiB) Viewed 2629 times
Everything looks better from the inside of a motorcycle helmet...
User avatar
alx123
Bangkok Rider
Bangkok Rider
Posts: 936
Joined: Mon Jul 25, 2016 10:58 am
Year: 2016
Color: Fast White
Location: Thailand

Re: Changing rear shock DIY

Post by alx123 »

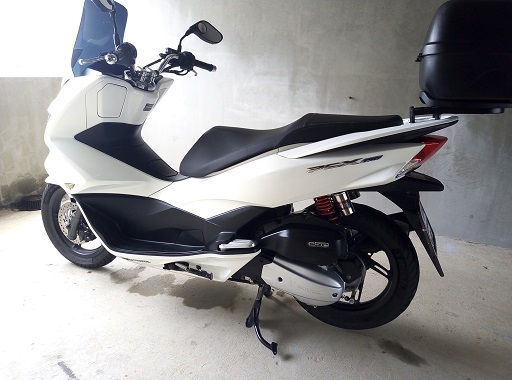
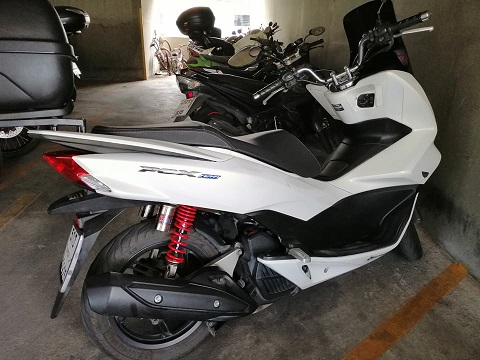
So I did it today and it's not as difficult as I thought it will be.

It took me approximately 1 1/2 hour as I decided to proceed slowly and carefully.

Here are the steps, jusyt like in the video above.

1.Remove the Givi Box, the plate, and its bracket.

2. Remove the rear cover using a screw driver
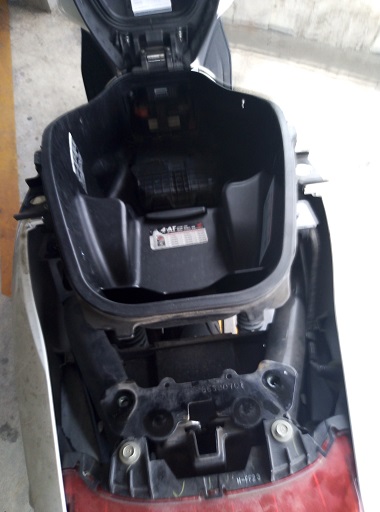
67352886_2628741827158734_6824206990391115776_o.jpg
67352886_2628741827158734_6824206990391115776_o.jpg (56.92 KiB) Viewed 2610 times
3. remove the handrails bolts using 12mm wrench

4. Remove all the bolts and screw holding the storage box (10mm bolts)
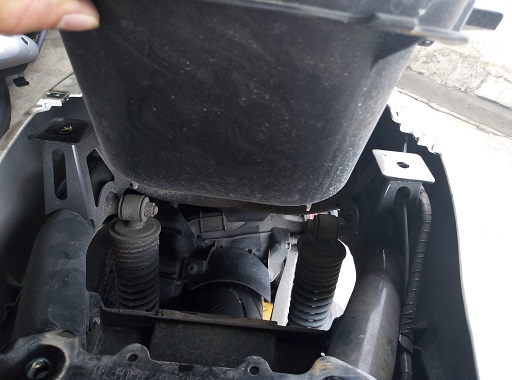
67312507_2628741923825391_187219393959165952_o.jpg
67312507_2628741923825391_187219393959165952_o.jpg (63.67 KiB) Viewed 2610 times
5. In my case I didn't even remove the storage box entirely, just lift it a little bit and then you will have enough space to remove the nuts on the top of the shocks.
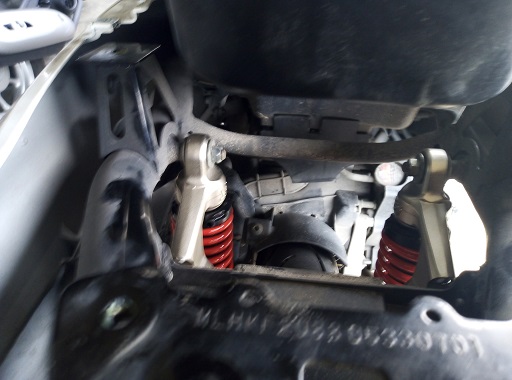
67470984_2628741867158730_1000500914932416512_o.jpg
67470984_2628741867158730_1000500914932416512_o.jpg (61.35 KiB) Viewed 2610 times
6. Remove nuts (14mm) on top of both shocks, as well as the bolts (12mm) holding the suspensions below. (no need to remove air filter box in 2014-2017 model)

7. Install both the new YSS shocks. Should be easy.

8. You need to remove the bolts (14mm) holding the muffler as it's not possible to re-insert the rear shock bottom bolt of the YSS shock. No trouble reinstalling on the left side though.
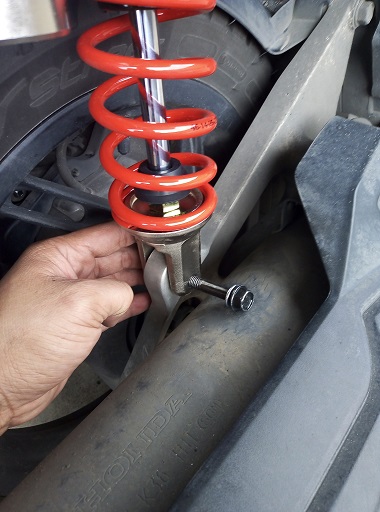
67287100_2628742060492044_1888797110631923712_o.jpg
67287100_2628742060492044_1888797110631923712_o.jpg (75.84 KiB) Viewed 2610 times
9. Once all bolts and nuts of the shocks are tightened, you can now slowly reassemble the scoot in the reverse order.
Tighten muffler > reinstall storage box > handrails > back cover > givi bracket and plate > givi box

Notes:

Rear shock top nuts torque (25 NM)
Rear shock bottom bolts (16NM)
Muffler bolts torque (30NM)

Tools
Wrenches (10mm,12mm,14,mm)
Screw Driver
Hex Key
Torque wrench
67684562_2628741733825410_1131334333257220096_o.jpg
67684562_2628741733825410_1131334333257220096_o.jpg (68.97 KiB) Viewed 2610 times
67493604_2399532570291740_3825497907071549440_n.jpg
67493604_2399532570291740_3825497907071549440_n.jpg (73.71 KiB) Viewed 2610 times

Done! and I'm glad I didn't mess up :lol:
Everything looks better from the inside of a motorcycle helmet...
User avatar
GeorgeSK
Forum Benefactor
Forum Benefactor
Posts: 986
Joined: Thu Jun 27, 2013 9:36 pm
Year: 13PCX,15Forza
Color: Both Red
Location: Danvers MA USA

Re: Changing rear shock DIY

Post by GeorgeSK »

Nice clean write up - thanks. I'll be very interested in your evaluation after a few rides.
On my scoot, getting there is WAY more than half the fun!

Please paste this address into a new tab and add yourself to the map: https://www.google.com/maps/d/edit?mid=1NlP7xk7KMdJReQnm-iDhldFBdpQ&ll=4.995760578398276%2C0&z=2
but please, don't delete anybody, no matter how badly they deserve deleting :)
User avatar
Mel46
Forum Benefactor
Forum Benefactor
Posts: 6959
Joined: Tue Nov 13, 2012 5:13 pm
Year: 2013
Color: red PCX
Location: Dallas, Ga USA

Re: Changing rear shock DIY

Post by Mel46 »

There have been a few inquiries on this forum about those types of YSS shocks with the canisters. It seems that they have become hard to find. I am glad that you have located some. As I understand it those are really comfortable. Let us know how you like them.
Currently own:
Red 2013 Honda PCX150

Givi tall windshield & tailbox - Lots of extra lights
Custom seat from Thailand - Bad Boy Airhorn
Takegawa Lowering Shocks - Michelin City Grip Tires
Headlight assy upgraded to LEDs w/HS5 main bulbs
NCY variator, drive face, and rollers
User avatar
alx123
Bangkok Rider
Bangkok Rider
Posts: 936
Joined: Mon Jul 25, 2016 10:58 am
Year: 2016
Color: Fast White
Location: Thailand

Re: Changing rear shock DIY

Post by alx123 »

Initial impression seem to be that this shock is stiffer than the OEM. I can feel all the road imperfections, which I'm not sure if I really prefer. On the other hand, I feel like the tires are gripping much better,esp on curves.

Riding alone, and as a light guy at 65kgs (144lbs), I like the OEM better because it is smoother. Riding with a back rider though, this shock works perfectly.

I'm gonna give it more time and give my feedback here again. But I guess, for non-Asians who are weighing more than me, this shock should be perfect. I adjusted the shock to its minimum preload setting but still it feels like a little stiffer.
Everything looks better from the inside of a motorcycle helmet...
User avatar
you you
What's a wot?
What's a wot?
Posts: 10000
Joined: Sat Jun 30, 2012 5:37 pm
Location: Between Lulu and Chichi

Re: Changing rear shock DIY

Post by you you »

alx123 wrote:Initial impression seem to be that this shock is stiffer than the OEM. I can feel all the road imperfections, which I'm not sure if I really prefer. On the other hand, I feel like the tires are gripping much better,esp on curves.

Riding alone, and as a light guy at 65kgs (144lbs), I like the OEM better because it is smoother. Riding with a back rider though, this shock works perfectly.

I'm gonna give it more time and give my feedback here again. But I guess, for non-Asians who are weighing more than me, this shock should be perfect. I adjusted the shock to its minimum preload setting but still it feels like a little stiffer.

Pie up son. :lol:
User avatar
alx123
Bangkok Rider
Bangkok Rider
Posts: 936
Joined: Mon Jul 25, 2016 10:58 am
Year: 2016
Color: Fast White
Location: Thailand

Re: Changing rear shock DIY

Post by alx123 »

you you wrote:
alx123 wrote:Initial impression seem to be that this shock is stiffer than the OEM. I can feel all the road imperfections, which I'm not sure if I really prefer. On the other hand, I feel like the tires are gripping much better,esp on curves.

Riding alone, and as a light guy at 65kgs (144lbs), I like the OEM better because it is smoother. Riding with a back rider though, this shock works perfectly.

I'm gonna give it more time and give my feedback here again. But I guess, for non-Asians who are weighing more than me, this shock should be perfect. I adjusted the shock to its minimum preload setting but still it feels like a little stiffer.

Pie up son. :lol:
not an option, im on my ideal weight and don't want to be sluggish on the mat :lol:
Everything looks better from the inside of a motorcycle helmet...
User avatar
alx123
Bangkok Rider
Bangkok Rider
Posts: 936
Joined: Mon Jul 25, 2016 10:58 am
Year: 2016
Color: Fast White
Location: Thailand

Re: Changing rear shock DIY

Post by alx123 »

67924877_2634427009923549_6821900502758850560_o.jpg
67924877_2634427009923549_6821900502758850560_o.jpg (127.04 KiB) Viewed 2559 times
After 30 kms of riding today, I can say that I'm starting to like the new YSS shocks. It gave the scoot a different feel when riding;It feels more sturdy and with better road feedback.

My initial impression on it's stiffness is based on the fact that I can feel the road surface imperfections more now. But on bigger humps and bumps, the YSS gives a much cushioned bounce than the OEM shock. When riding with a passenger, it's perfect.

Now I'm thinking of upgrading the front forks next, as I can feel its inferior performance more now. :lol:

The YSS front fork upgrade kit is more expensive than my YSS rear shock though. :o o_O
Everything looks better from the inside of a motorcycle helmet...
User avatar
Sandymay
Scooter Sandy
Scooter Sandy
Posts: 189
Joined: Sun Oct 16, 2016 5:16 am
Year: 2015
Color: Bronze
Location: Orillia, Ontario

Re: Changing rear shock DIY

Post by Sandymay »

The new shocks in red really look great with your white PCX. :)
Jge64
Frequent Poster
Frequent Poster
Posts: 1830
Joined: Wed Jun 10, 2015 4:30 pm
Year: 18 300 xmax
Color: White
Location: Fort lauderdale
Contact:

Re: Changing rear shock DIY

Post by Jge64 »

ive had two sets yss's- one resevoir and one regular..

both sets felt much better once broken in at 50-100 miles.....

the preload settings do a lot, try messing with a few diff settings....
Glen
‘15 PCX build thread here:
https://www.hondapcx.org/viewtopic.php?f=2&t=4640
Current: ‘18 XMAX 300 & ‘22 NAVI
Old Grinner
Forum Benefactor
Forum Benefactor
Posts: 2479
Joined: Fri Aug 03, 2018 8:09 am
Location: USA

Re: Changing rear shock DIY

Post by Old Grinner »

The shocks look good . . ..

The pics show close-up detail of what you had to do to swap them out.

Now you can dial in the ride a little better. :D
User avatar
alx123
Bangkok Rider
Bangkok Rider
Posts: 936
Joined: Mon Jul 25, 2016 10:58 am
Year: 2016
Color: Fast White
Location: Thailand

Re: Changing rear shock DIY

Post by alx123 »

Sandymay wrote:The new shocks in red really look great with your white PCX. :)
I believe it added a bit of red variation to the rather boring all black and white.
Jge64 wrote:ive had two sets yss's- one resevoir and one regular..

both sets felt much better once broken in at 50-100 miles.....

the preload settings do a lot, try messing with a few diff settings....
Yeah, it feels that the shock feels different the more miles tat I'm using it. Or it could be my butt getting used to it too :lol:

I'm using the minimum preload for now, as I'm guessing this will give me the smoothest ride as this shock is a little stiff? But I will soon try diff settings to see how diff preload feels.
Old Grinner wrote:The shocks look good . . ..

The pics show close-up detail of what you had to do to swap them out.

Now you can dial in the ride a little better. :D
Right on, it feels like a diff ride for now. I will try to upgrade the front suspension as well and maybe this will delay my itch to upgrade to a bigger scoot maybe by a year or two. :D
Everything looks better from the inside of a motorcycle helmet...
RobV
New Member
New Member
Posts: 35
Joined: Sun Oct 13, 2019 8:38 pm
Year: 2012
Color: Red
Location: Melbourne, Australia

Re: Changing rear shock DIY

Post by RobV »

I want some! Where did you get the shocks from?
User avatar
Mel46
Forum Benefactor
Forum Benefactor
Posts: 6959
Joined: Tue Nov 13, 2012 5:13 pm
Year: 2013
Color: red PCX
Location: Dallas, Ga USA

Re: Changing rear shock DIY

Post by Mel46 »

I am going to guess that they cost a bit over $250. I know the ones with the canisters are not cheap. Remember, alx123 lives in Thailand. I am sure they cost less there.

You could probably find them on Bikerzbits.com

https://bikerzbits.com/honda/pcx/pcx-12 ... absorbers/

Or Japan.webike.net

https://japan.webike.net/bm/brd/Suspens ... /1080/856/
Currently own:
Red 2013 Honda PCX150

Givi tall windshield & tailbox - Lots of extra lights
Custom seat from Thailand - Bad Boy Airhorn
Takegawa Lowering Shocks - Michelin City Grip Tires
Headlight assy upgraded to LEDs w/HS5 main bulbs
NCY variator, drive face, and rollers
Post Reply